1. Introduction & Getting Started
What is Substack Pro Studio?
It’s a tool I built for Substack writers and creators, and it's designed to transform your Notes into a revenue-generating system. It is based on insights from hundreds of chats and discussions with other creators who want to grow their newsletters, subscribers, and revenue.
It is perfect for:
Substack Writers & Content Creators
Schedule Notes during peak audience hours (even while you sleep)
Analyze which content drives the most subscriptions
Never miss a posting opportunity with automated scheduling
Turn your best-performing content into subscriber magnets
Solopreneurs Building Online Businesses
Use Notes to funnel readers to your paid newsletter
Track which topics generate the most conversions
Automate consistent content without burning out
Build authority with strategic, theme-based posting
Bloggers Driving Newsletter Traffic
Cross-promote blog content through strategic Notes
Measure which Notes drive the most newsletter signups
Schedule consistent promotional content across time zones
Optimize posting times for maximum blog traffic
System Requirements
You need a Chrome browser and a Substack account with the Notes feature enabled (see Settings / Notes in your Substack account).
For Scheduled Posting, you MUST keep your browser open and prevent your computer from going to sleep.
Why? - Substack Terms of Service (substack.com/tos) explicitly say that you cannot share your account credentials.
This is why the only allowed way to schedule Notes is to let YOUR browser, using YOUR credentials and YOUR computer do the posting.
Any other way (like letting some third-party cloud service do the scheduling and posting using your credentials) would put your Substack account at risk of termination.
Then all your hard work building a Substack newsletter could be destroyed.
How can you prevent the computer from going to sleep? See details in section 18. FAQ & Best Practices below.
Product Launch
I am planning to launch Substack Pro Studio on August 29th, 2025. Existing Substack Notes Scheduler customers will receive a discount code if they want to upgrade.
Before that, I have a beta version available for beta testers, with specific test criteria to replicate my growth experiment. You can read the details from here:
Also, I’m planning to launch a Custom GPT bundle product version with Yana G.Y. - Yana will provide the details to her subscribers on August 29th, 2025, as well.
Purchasing
After the launch, the Substack Pro Studio will be generally available on my Gumroad store.
I have a comparison table on the Gumroad store home page if you are wondering which product is best for your use cases.
After a purchase, you get an email from Gumroad with a download link.
Save this email because you can find updated versions of the product from the same link.
🧩 How to Install in Chrome Browser
Follow these six steps to install the extension in your browser:
1. Download & Unzip
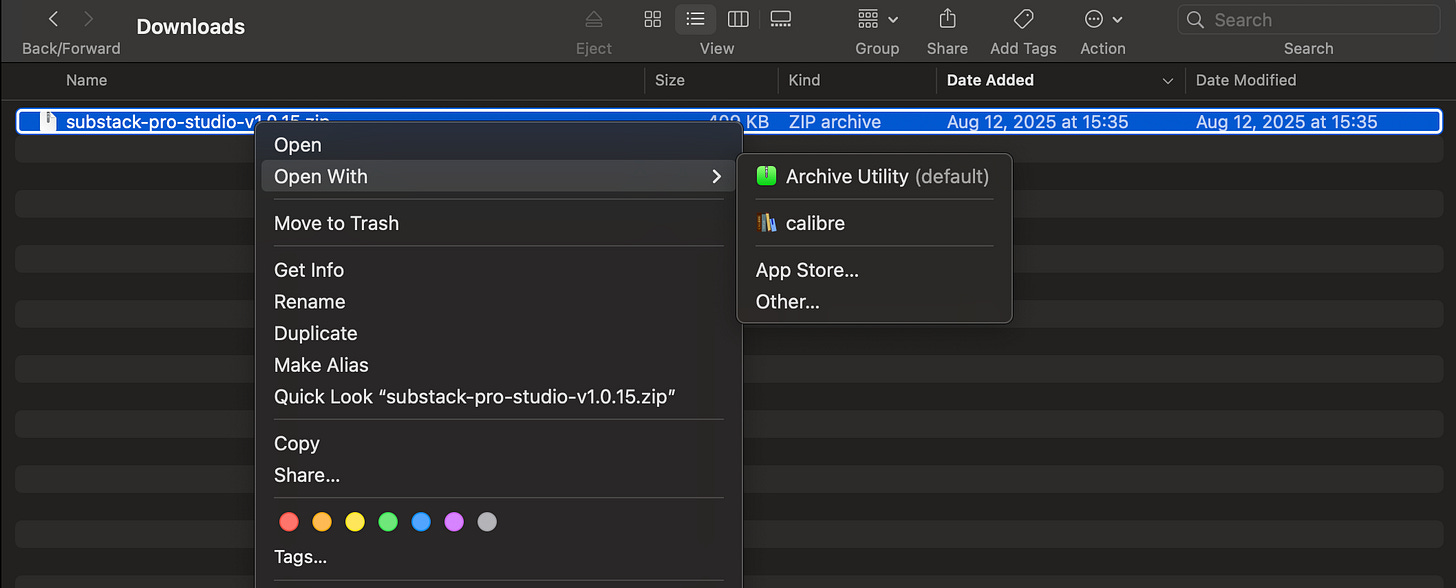
Download the .zip file and unzip it (right-click → “Extract All” or double-click to open, then drag the folder out).
On a Mac, hold the Control key down, click, and select Open With > Archive Utility. This will unzip the file and create a folder with the extracted files.
👉 Make sure you’re selecting the unzipped folder, not the .zip file!
📁 The unzipped folder should contain files like manifest.json, not just another folder.
✅ You should see the following extension files
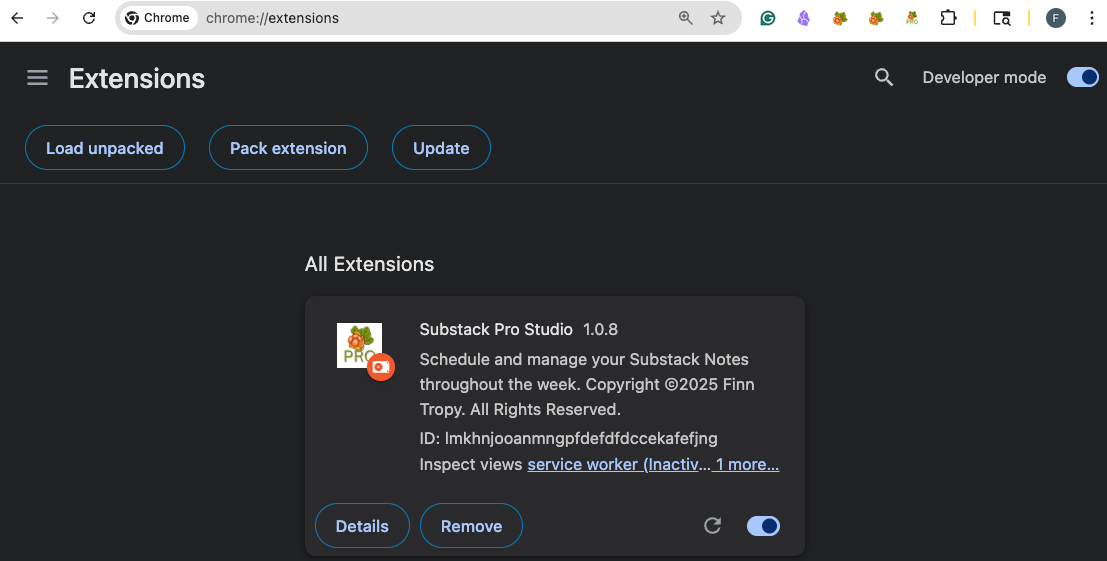
2. Open Chrome Extensions Page
In Chrome, go to:
chrome://extensionsPaste that into the address bar and hit Enter.
3. Enable Developer Mode
In the top-right corner of the Extensions page, turn on Developer mode.
4. Load the Extension
Click the “Load unpacked” button.
Then, select the folder you just unzipped (the one that contains manifest.json directly inside).
🚫 Do NOT select the .zip file
🚫 Do NOT select a folder inside the unzipped folder
If you encounter the error "could not load manifest," ensure that you have followed the instructions. You have either selected the ZIP file itself or a folder inside.
5. Activate It
Once loaded, ensure the extension is toggled on using the bottom right toggle.
6. Pin It for Easy Access
Click the puzzle piece icon (🧩) in the Chrome toolbar.
Then click the pin 📌 next to Substack Pro Studio to keep it visible (you’ll see a little cloudberry icon with PRO appear)
Click the icon to access the Substack Pro Studio.
2. First-Time Setup & Onboarding
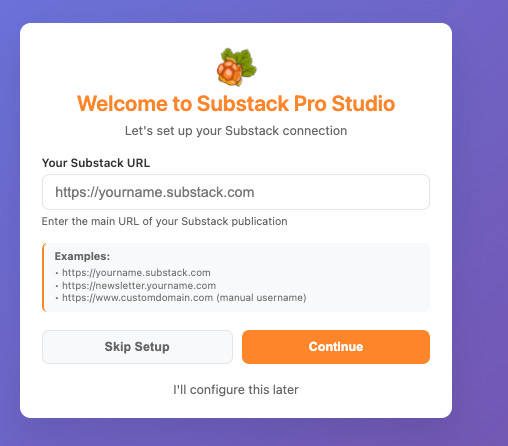
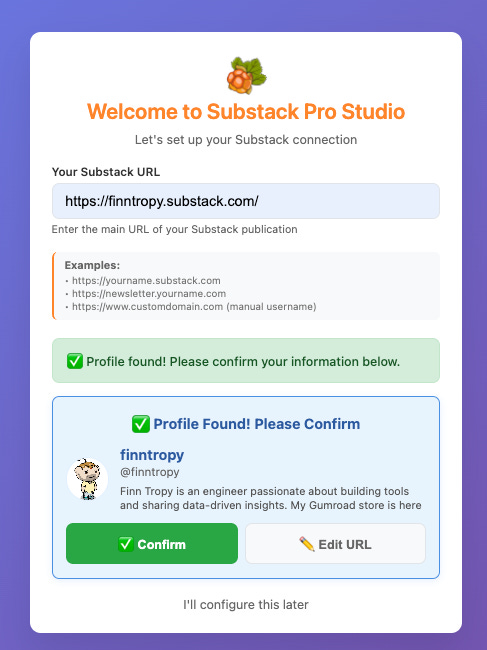
When you launch the software for the first time, it will present a Welcome Screen.
The onboarding interface will ask you to enter details, such as
Your Substack URL - it will perform URL validation and profile verification
Connection Testing - Ensuring proper Substack integration
Skip Options - Configuring later if needed
For custom domains, you may be prompted to enter your Substack username.
This is needed for the software to work correctly.
If you get 404 errors, you may have Notes disabled. Go to your Settings page and enable the Notes tab - see example below:
From version 1.0.20 onwards, the software will autodetect these 404 errors and suggest enabling Notes.
3. Core Interface Overview
The user interface follows modern web design principles.
Dedicated Window Mode - Persistent, resizable interface (not a pop-up window)
Main Navigation Tabs - Schedule, Kanban, Analytics, AI Assistant, Support, Settings
Product Context - "Product: Substack Pro Studio" branding.
Substack Pro Studio supports custom GPT integrations.
Responsive Design - Adapts to any window size
Version Information - Current version display (1.0.xx)
4. Schedule View - Weekly Planning
When you open the Schedule for the first time, you will see a 7-day calendar grid view with time slots as rows and weekdays as columns, Monday through Sunday.
The standard time slots are 2-hour intervals from 08:00 AM to 08:00 PM, your local time.
You can create a new Custom time slot at any time, and this can be a valuable feature if your primary audience is located in another time zone. For example, if you are located in Australia and your targeted audience is in the U.S., you may want to schedule some slots for the U.S. daylight hours.
If you use the Notes Sync feature, it will create Historical timeslots based on the actual posting time of your Notes.
You can navigate to historical or future weeks using the Previous/Next buttons or using the Left and Right arrow keys on your keyboard. I prefer the keyboard because it is faster.
Week Labels - "This Week Jul 28 - Aug 3" with keyboard navigation hints
Sticky Time Column - Always-visible time slot reference
Visual Indicators - Theme badges, image counts, rich text indicators
Content Types Display - Historical, Tips, Inspiration, with engagement metrics
Status Icons - Green checkmarks, clock icons, engagement metrics (hearts, restacks, comments)
4.1 Icon Meanings in the Weekly Grid
Each Note has one or more icons with specific meanings.
Each Note can be assigned a theme in the Editor view or by the AI Assistant.
Header Icons (Left side - Theme):
💡 Tips - Lightbulb icon for tips and advice notes
✨ Inspiration - Sparkle icon for inspirational content
❓ Question - Question mark for Q&A style notes
📖 Story - Book icon for narrative/story content
💭 Opinion - Thought bubble for opinion pieces
📰 News - Newspaper icon for news/current events
📝 Default - Document icon for general notes
Scheduler is using the Note status as explained below.
Status Icons (Right side - Note Status):
⏰ Red Clock - scheduled status (note is scheduled to be posted)
🔄 Yellow Arrow - posting status (currently being posted - should take only a few seconds)
✅ Green Checkmark - posted status (successfully posted)
❌ Red X - failed status (posting failed)
Each Note can have other attributes, such as attached images or sync status.
Feature Icons (Right side - Note Features):
🖼️ Image Icon - Note has attached images
✨ Green Sparkle - Rich text content (see Editor for available features)
📜 Purple Scroll - Historical note imported from Substack ( use Sync feature for that)
⏱️ Orange Clock - Custom time slot (not a standard 2-hour interval)
If you are trying to schedule multiple notes in the same timeslot, you may see a conflict indicator:
Conflict Indicators:
⚠️ Red Warning - Multiple notes scheduled at the same time slot
Number after warning - Shows how many notes are conflicting (e.g., "⚠️3" means 3 notes at the same time slot)
After using the Sync feature that is fetching your published Notes from Substack, including engagement metrics, you can see the following icons with numbers:
Metrics (Bottom - for Historical Notes):
❤️ Red Heart + Number - Reaction count from Substack
🔄 Grey Arrow + Number - Restack count from Substack
💬 Grey Speech Bubble + Number - Comment count from Substack
👁️ Eye + Number - Click count from Substack
Word Count (Bottom right):
"X words" - Shows the word count for the note content
4.2 Editor View
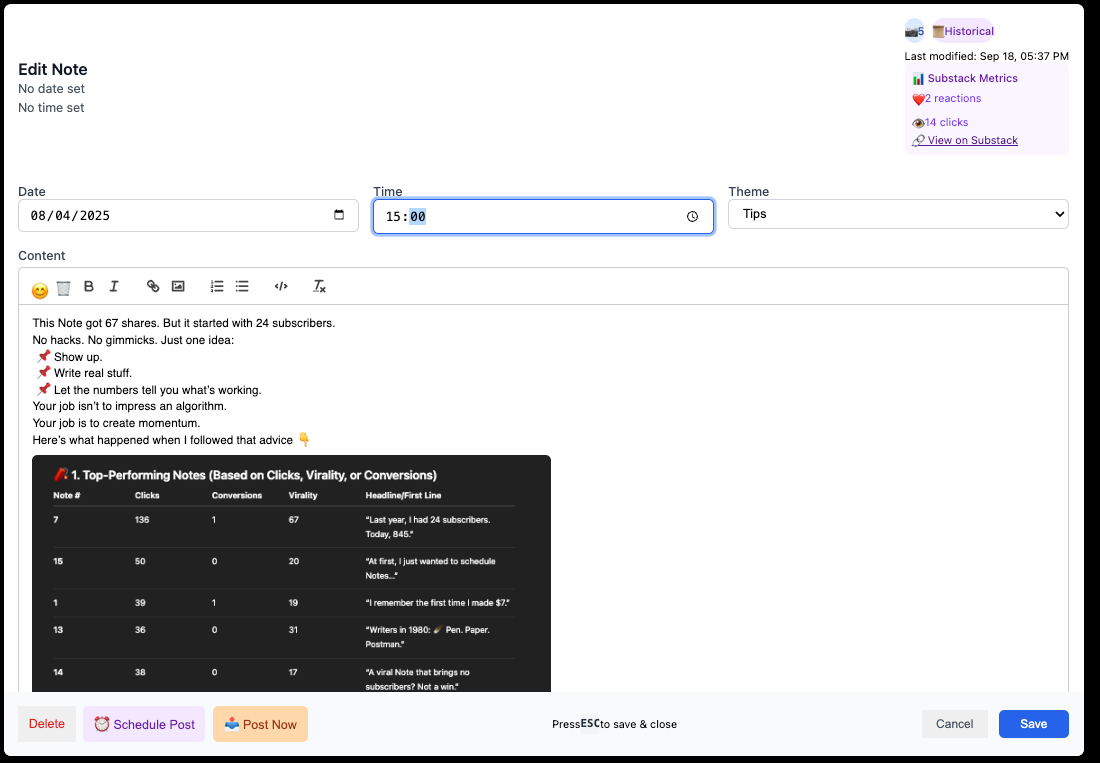
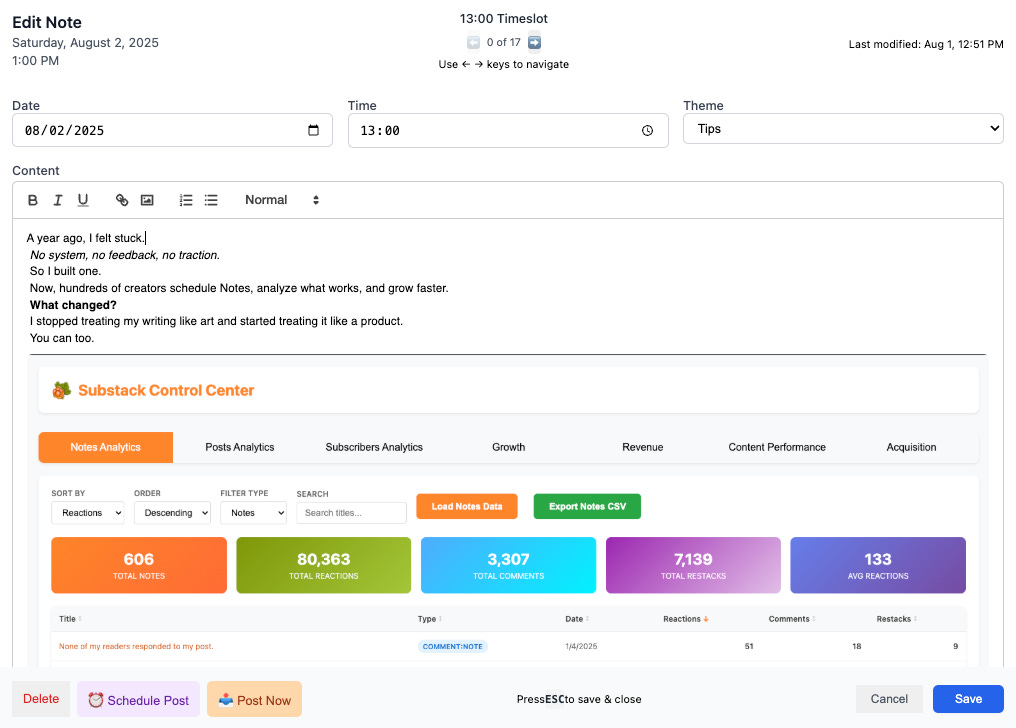
When you click a timeslot, the Editor Window will pop up. It can be an empty Note, if you clicked a grid element with a + icon, or an existing historical Note, as shown in the screenshot below.
On the top row, you can see
The note date and time are on the left
The timeslot that this note was assigned to, with the number of notes in the same slot, and an indicator of which one is the current one you are looking at.
You can quickly navigate other notes in this timeslot using the Left and Right arrow keys, and check if there is a consistent flow of ideas.The icon attributes, such as the number of image attachments, sync status, Substack metrics, etc. If this is a historical note, there is a link to Substack, which opens a new browser tab to your note.
The second row shows a date and time selector, which is used in scheduling, as well as the Theme for this note. The default theme is Tips.
On the third row, you can see the rich text editor. The icons are the following:
😀 Emoji - select emoji to the editor
🗑️ Trash can - clear the editor window to start a new note
B - make selected text bold
I - make selected text italic
🔗 - make selected text a web link. A pop-up window will ask you to enter the URL
🖼️ - image icon will open a file selector for you to attach a PNG or JPEG image to your note. You can add a maximum of six images per note.
You can also drag and drop an image on the editor window using your file browser.
Ordered List - converts selected text into an ordered list with numbers
Bullet List - converts selected text into a list with bullets
</> - code block for multiline quotes, AI prompts, or software code
Tx - removes the formatting from selected text. Useful when copying and pasting formatted text from web pages, etc.
If you paste a web URL that supports the OpenGraph protocol, the software attempts to fetch og:image metadata from the page, and will attach the picture below the URL link.
The bottom row buttons are the following:
Delete - will delete the Note from the Chrome local storage
Schedule Post - will attempt to schedule the post. You cannot schedule in the past.
Post Now - will do immediate posting
Cancel - discards any unsaved edits and returns to the previous view
Save - saves the note content, metadata, and closes the editor
ESC key: Also saves the note before closing
5. Kanban Board View - Workflow Management
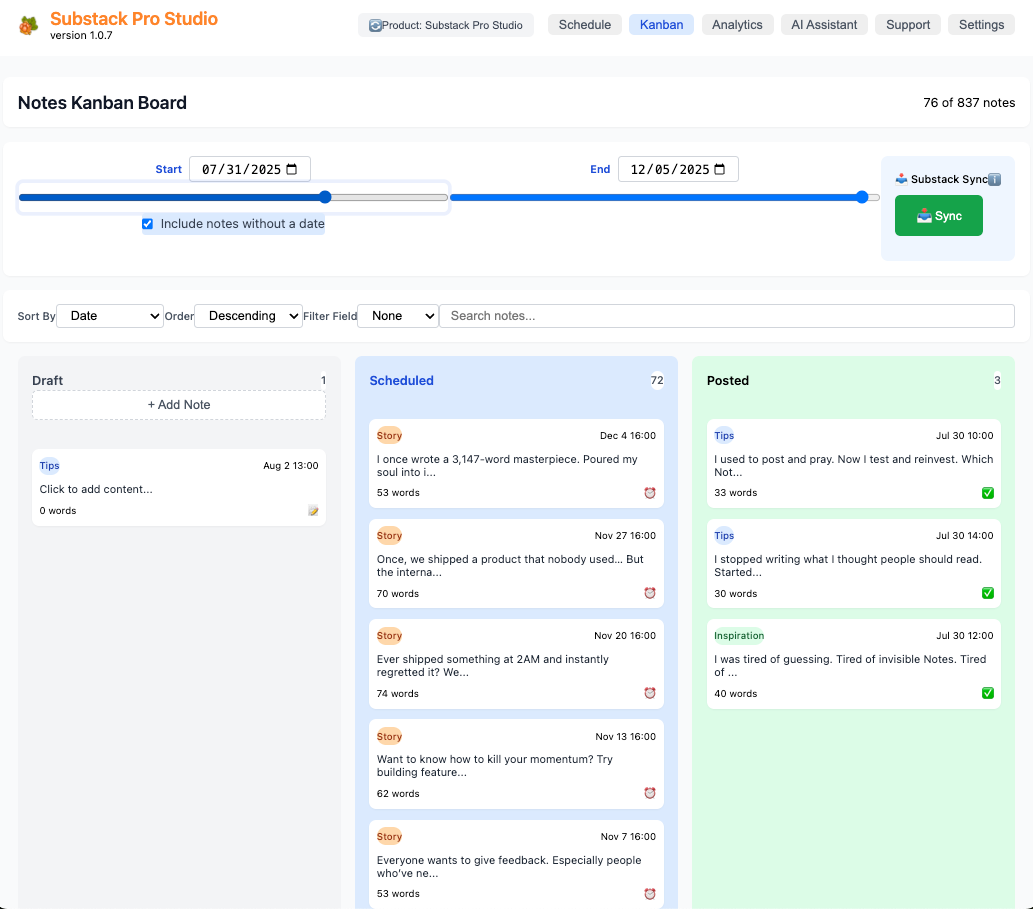
Kanban view is designed to help with your workflow.
Here are the main features of this view:
Three-Column Layout - Draft, Scheduled, Posted. The “Failed” column is visible only if the Note(s) failed to post.
Note Counts - "76 of 837 notes" with column-specific counts based on the filters
Date Range Filtering - Start/End date pickers with sliders
Include Notes Without Date - Checkbox option for a comprehensive view
Substack Sync - Cloud sync functionality with sync button, pulls your posted notes from Substack, with engagement metrics.
Filtering & Search - Sort by, order, filter field, and search functionality
Draft Column - Create Empty notes with the "Add Note" button
Scheduled Column - Notes with alarm clock icons, future dates, and time slots
Posted Column - Published notes with green checkmarks
Note Cards - Theme labels, content previews, word counts, dates
You can create a Draft note and then drag and drop it to the Scheduled column, and the software will automatically find an empty time slot.
6. Analytics Dashboard - Performance Insights
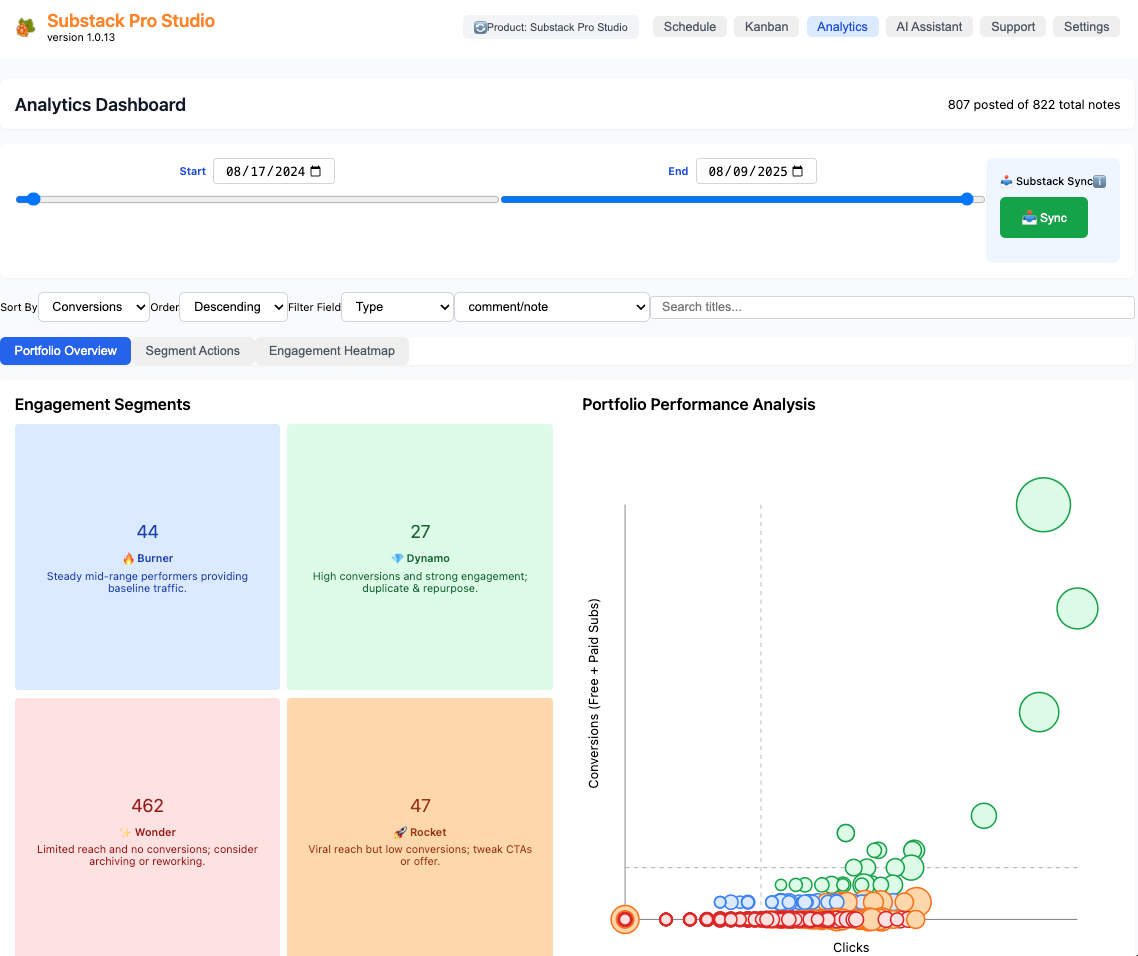
The Analytics dashboard is designed to give you insights into how your Notes are performing by using a segmentation algorithm I developed.
It has a standard Date Range Filtering for customizable analysis periods, and a Sync button that will fetch your existing posted Notes from Substack, along with engagement metrics. You can find a “Sort By”, “Order”, and “Filter Field” drop-downs that are useful for finding Notes with the highest conversions, clicks, virality (reactions+restacks+comments), Type, Media, or Date data.
There is a Search bar that helps you find a specific Note by keyword.
The subtabs are showing the same filtered data in different views.
Portfolio Overview Tab
The Portfolio Overview Tab shows high-level performance metrics organized by four color-coded segments.
The Portfolio Performance Analysis bubble chart shows individual notes (bubbles are clickable, and will open up your note in another tab), where color shows the segment and bubble size shows the virality. The Y-axis position shows how many free and paid subscribers this note has generated, and the X-axis position shows how many clicks the note has.
If you are starting to write Notes, it is normal to have no conversions. It took me almost two months and 51 posted notes to get the first note that converted a free subscriber.
The Engagement Segments view shows four performance categories and the number of notes in each segment, based on your filtering criteria.
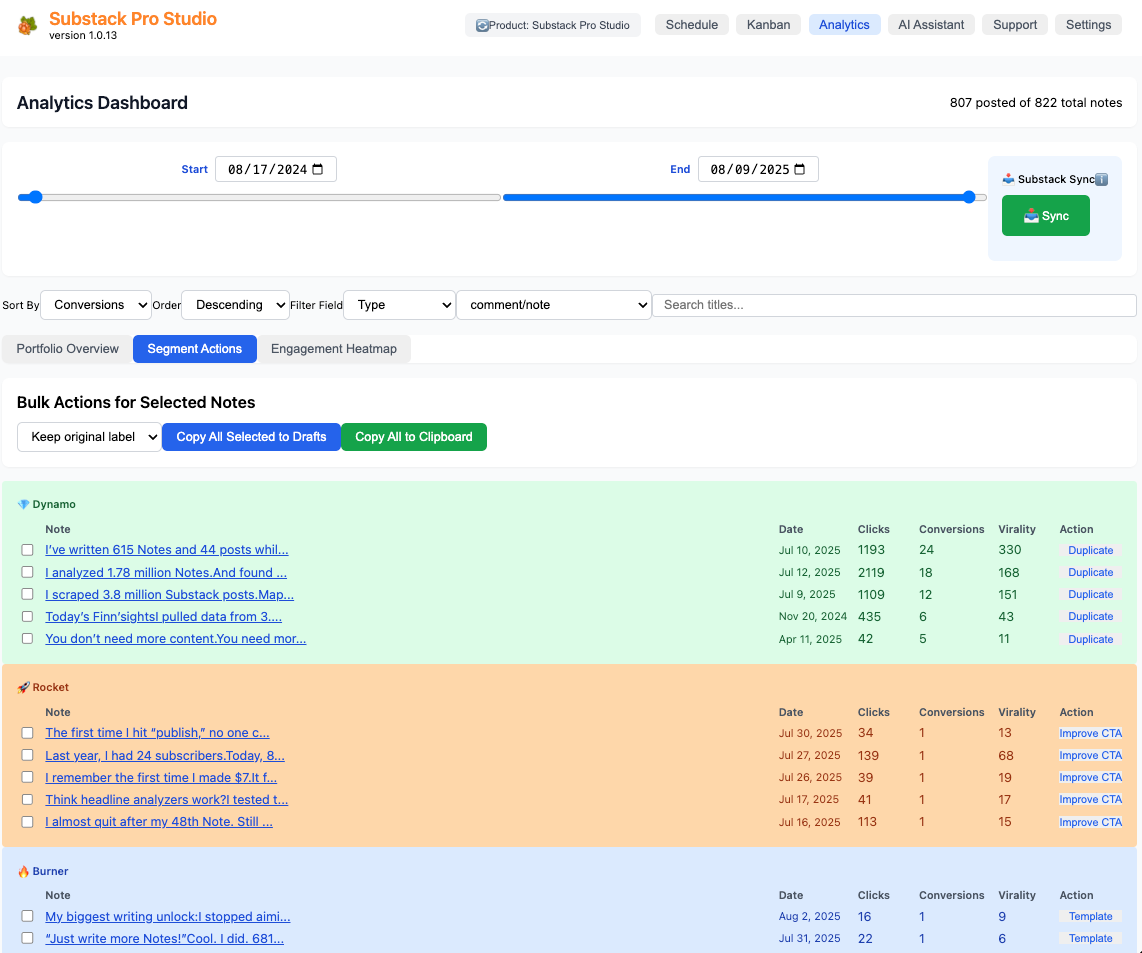
💎 Dynamo - High conversions and strong engagement
🚀 Rocket - Viral reach but low conversions
🔥 Burner - Steady mid-range performers
✨ Wonder - Limited reach and no conversions
Segment Actions Tab
The Segment Actions Tab shows detailed note-by-note analysis.
The default Sort order shows the highest converting notes on top. You may want to experiment with sorting by Clicks, Virality (reactions+restacks+comments), or other fields, like Media.
This view enables you to find and compare your best-performing Notes, whether your goal is clicks, virality, or growing your newsletter with new subscribers.
Since most people don’t remember what you wrote 3 to 6 months ago, you can reuse your past high-performing Notes and repurpose them with a few clicks.
Bulk Actions - Copy selected notes to drafts, copy to clipboard
Note Analytics Tables - Detailed metrics for each segment
Action Recommendations - Duplicate, Improve CTA, etc.
If you copy your high-performing Notes to the clipboard, you can use your favorite AI tool to analyze them, or mix the best parts and create a new Note. See the AI Assistant section below.
Engagement Heatmap
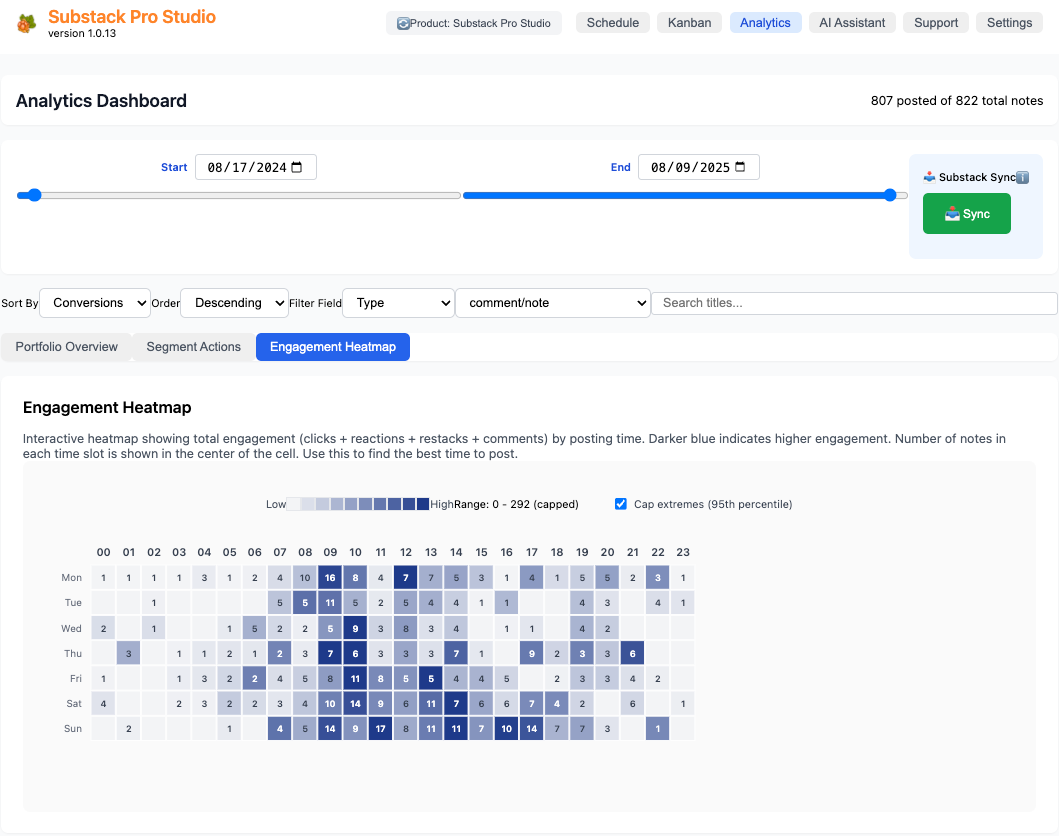
The Engagement Heatmap shows the total engagement (clicks + reactions + restacks + comments) by posting time. Darker blue indicates higher engagement.
By clicking the “Cap extremes (95th percentile)” checkbox, you can filter out your most viral Notes that tend to skew the heatmap color map.
The number of notes in each time slot is shown in the center of the cell.
You can filter by Type “comment/note” to see only Notes you’ve written, and exclude comment/restacks and post/restacks.
Use this to find the best time to post based on your audience's rhythm.
Here is a short video clip that shows the rhythm of my audience over one year:
7. AI Assistant - Content Generation Workflow
I designed the AI Assistant section to make it easier to use your favorite AI tools, without adding any costs or new subscription fees.
Here is a 5-minute video tutorial on how to use the AI Assistant effectively:
The design has a Four-Step Process for guided AI content creation, but each step can be used independently.
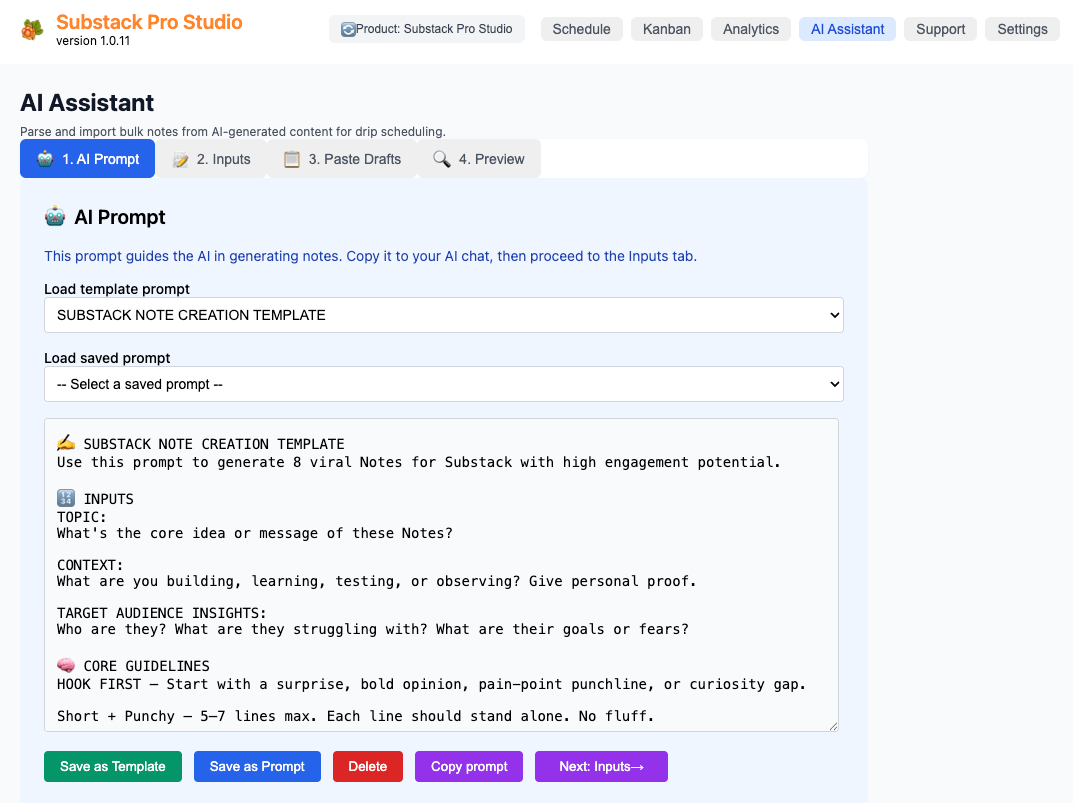
Step 1: AI Prompt - Template management and prompt configuration
The Prompt Management allows you to save, delete, and load AI prompts from preset templates or your own collection.
The Copy Prompt button will grab the AI prompt to the clipboard, ready to be pasted into ChatGPT or whatever AI tool you are using today.
I have included several prompt templates as examples that generate high-performing notes on Substack, based on my extensive testing.
Step 2: Inputs - Topic, context, and audience specification
The Input Configuration provides structured input fields with placeholders. You can save inputs for later, load them to be reused, and edit them to give a different topic or context.
The Topic field should talk about the core idea or message of the Notes you want to generate.
The Context field should explain what you are building, learning, testing, or observing. Provide personal proof with details, so that readers can make a connection to your writing.
For the target audience insights, you need to describe things like: “Who are they? What are they struggling with? What are their goals and fears?”
I have used the Four Factor Analysis (4FA) framework to create some samples and edited them for clarity. You can find example prompts from this article:
Use the Copy Input button to copy all this input to the clipboard and paste it below the AI prompt from step 1.
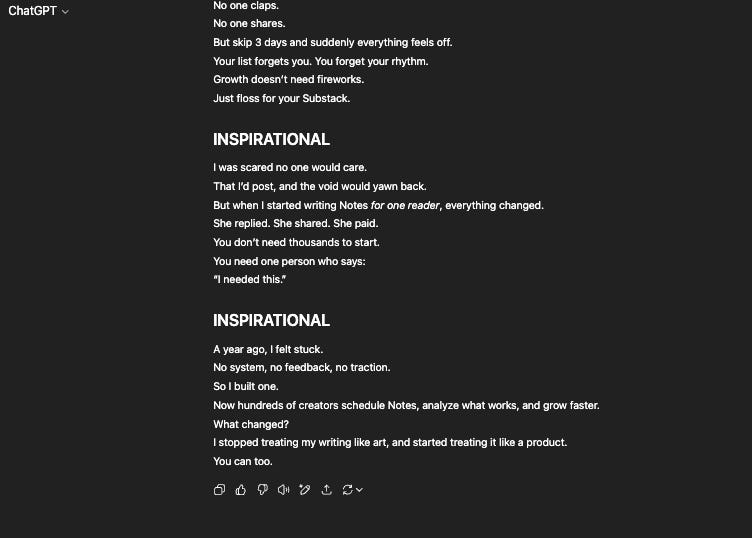
Now you can ask the AI to generate notes.
Step 3: Paste Drafts - AI-generated content import with format validation
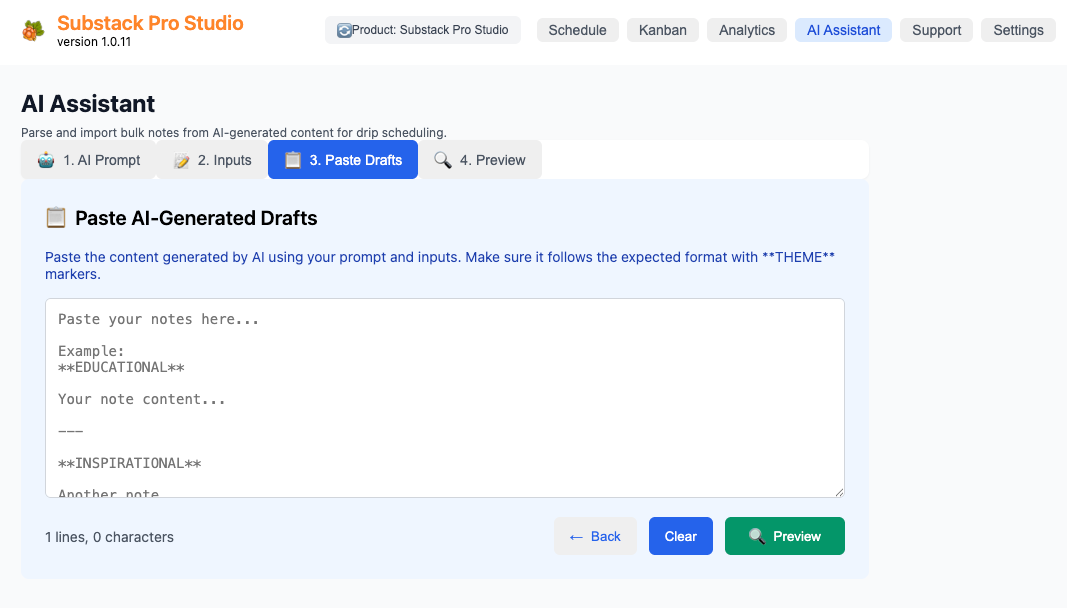
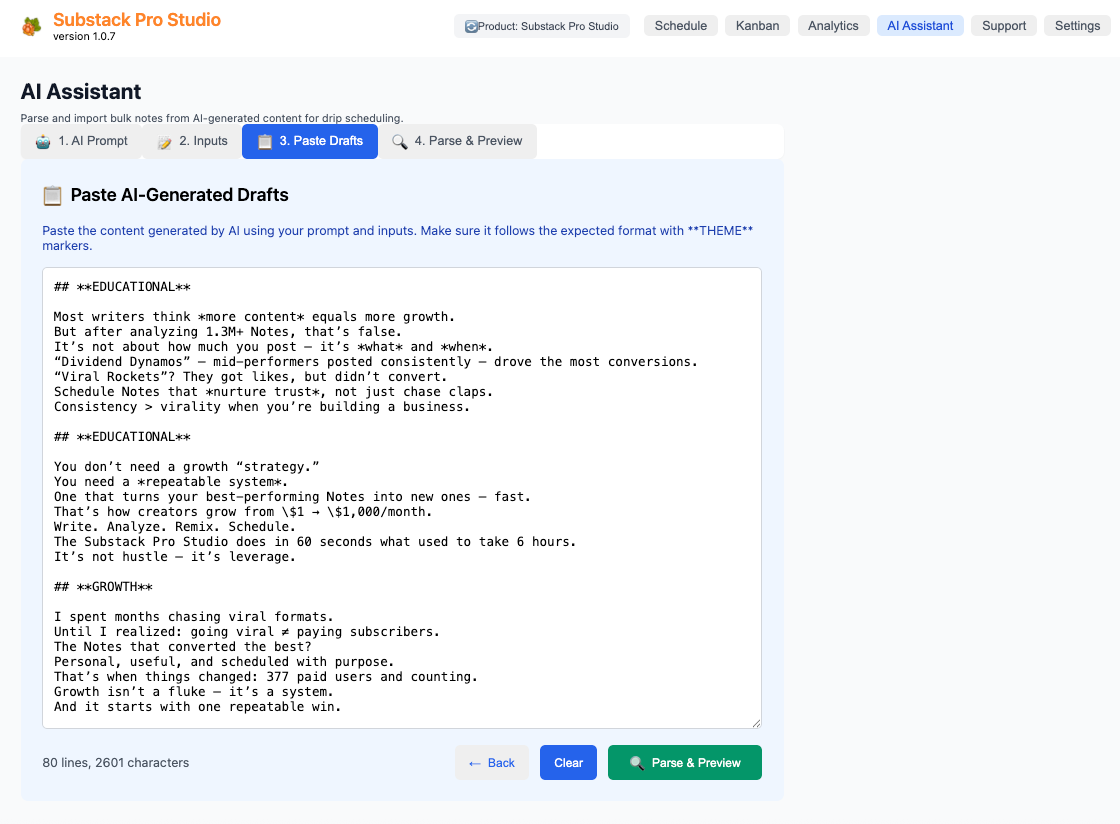
Once you have the AI-generated materials ready, you can paste the drafts in step 3.
This step expects the material in a particular format, with a clear THEME marker and a separator between notes.
This is why we have the following section in the built-in prompt.
🎯 FORMATS TO FOLLOW
You must generate exactly 8 Notes, two in each format below:

EDUCATIONAL — Teach 1 clear idea. Show a fresh angle.

GROWTH — Show personal discovery, mindset, or performance insight.

ENTERTAINING — Share a witty take, surprising story, or unexpected twist.

INSPIRATIONAL — Tell a pain-to-triumph or motivation arc.

✅ FINAL OUTPUT INSTRUCTIONS
Each Note must start on a new line with the heading exactly as EDUCATIONAL in double asterisks and all caps,
with no other markdown or characters before it.
Do not add any hashes (#), underscores, or other markdown syntax

Then insert a --- line directly underneath to separate each Note clearly.

⚠️ This formatting is mandatory. Do not skip it.
Once you have pasted the correctly formatted text, you can click the "Preview” button. The software will attempt to read the whole text block and create separate notes based on the format.
If your content has links, you can add the following section in your customized prompt. You can also edit the links manually in the Paste Drafts window. If your link includes the OpenGraph preview image (og:image meta tag), the image will appear in the Kanban view.
LINK FORMATTING RULE:
When including links in notes, always use markdown link syntax: [Link Text](URL)

Examples:
✅ CORRECT: Check out [this article](https://example.com) for more info.
✅ CORRECT: [Listen here](https://music.apple.com/album/123)
❌ INCORRECT: Check out this article: https://example.com
❌ INCORRECT: Listen here: https://music.apple.com/album/123

This formatting enables clickable links with automatic preview images when notes are added to the drafts queue.
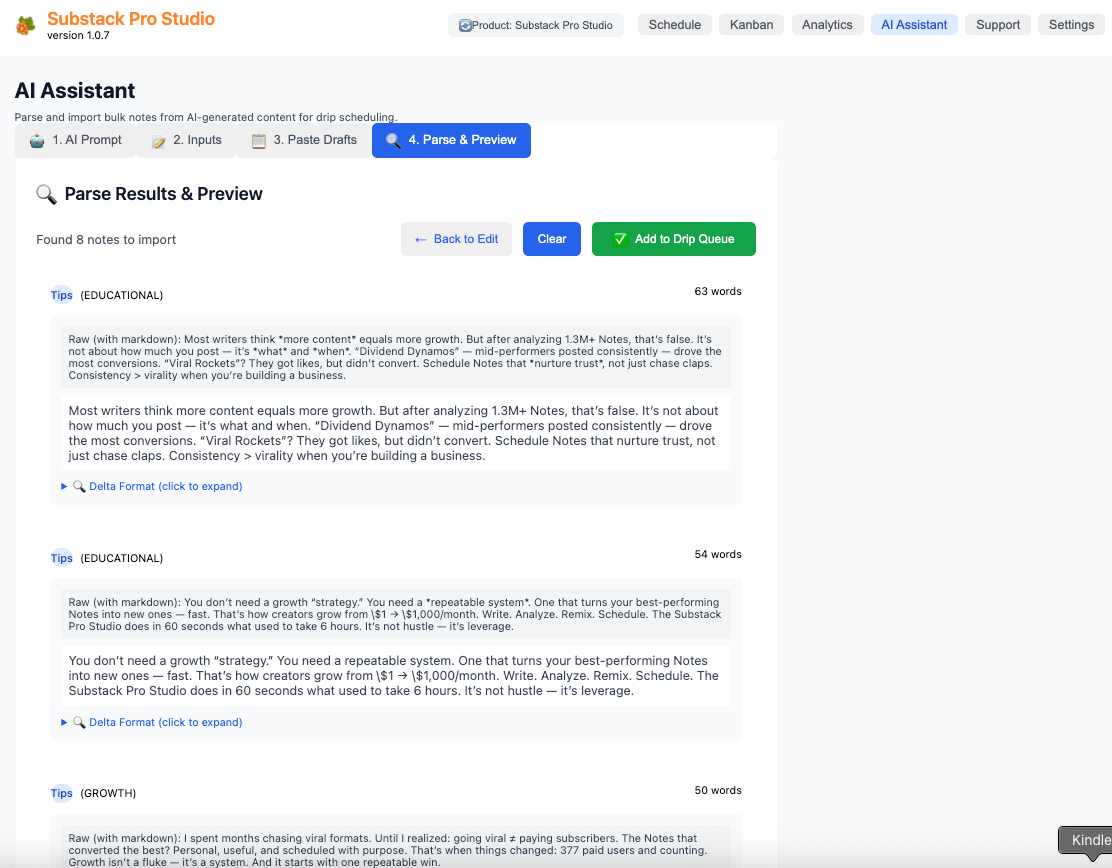
Step 4: Preview - Content preview before import
The Preview tab is showing the separated notes from the previous step. Review parsed notes before clicking the Add to Drip Queue button.
To understand Drip scheduling, please review sections 10 and 11 below.
Using these four steps, you can generate a week or several weeks' worth of note drafts in just a few minutes.
But this is not the only use case for the AI Assistant.
Other AI Assistant Usage Scenarios
As explained in section 6, you can use AI to analyze your best (or worst) performing Notes, and using a proper prompt, ask AI to combine the best features of multiple Notes.
In the article below, I am demonstrating how you can find your two top-performing notes, let AI perform an in-depth analysis, compare selected Notes from multiple perspectives, and then finally generate a new Note that combines the strengths into one or multiple new Note drafts.
All this can be done in less than 60 seconds, as demonstrated in the video:
With some imagination, you will find many other AI usage scenarios, such as
Brainstorm new product ideas based on what resonates with your audience
Create an ebook outline from your highest-performing Notes
Draft a new article outline by combining ideas from several high-performing Notes
You can save your AI prompts for quick retrieval, which helps streamline your workflow if your business focuses on ebooks or other digital products. You can build consistent themes across your offerings and Notes, making them more interesting for your readers.
8. Creating & Editing Notes
I designed a Note editor that has the following features:
Click-to-Edit - Modal editor for any time slot or status
Rich Text Editor - with multiple formatting options, including links and attached images
Image Upload - File picker to attach PNG, JPEG, or WEBP image files. Drag and drop images into the editor window works as well.
Theme Selection - Color-coded content categories for theme-based drip scheduling
Auto-Save - Automatic content preservation
Metadata Display - Time slot, last modified date, and time
Content Preview - Rich text preview including images
You can Delete, Schedule Post, and Post Now by clicking the button at the bottom. You can use the ESC key to save and close, or Cancel if you don’t want to save your edits.
9. Advanced Note Management
Once you have edited your Note draft, you have multiple options to manage your content workflow.
On the Schedule view, you can fill your weekly content calendar using
Drag & Drop Rescheduling - Intuitive note movement to empty slots
Conflict Prevention - Automatic scheduling conflict detection
Edit Window Navigation - Arrow keys to browse the same-time slot notes over the days
Smart Navigation - Position indicators and keyboard hints
10. Theme System & Organization
The Theme System enables writers to organize their Notes by different themes.
There are Default Themes such as Tips, Inspiration, Question, Story, Opinion, and News. These have Color Coding for quick visual theme identification.
Using the Theme Manager, you can create, edit, and delete your own custom themes.
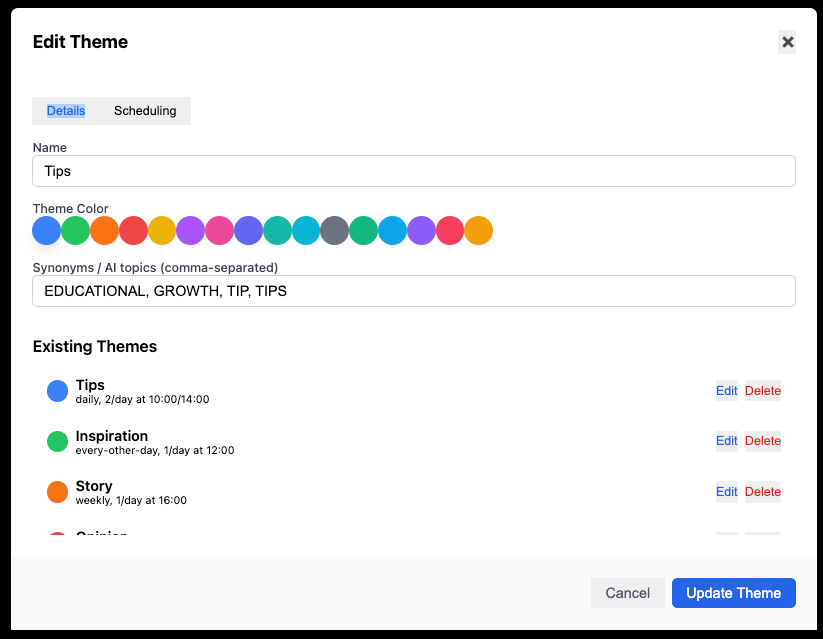
Here are screenshots of the theme name, color code, and synonyms.
The Synonyms are used in parsing AI-generated notes topics (see section 7 for details).
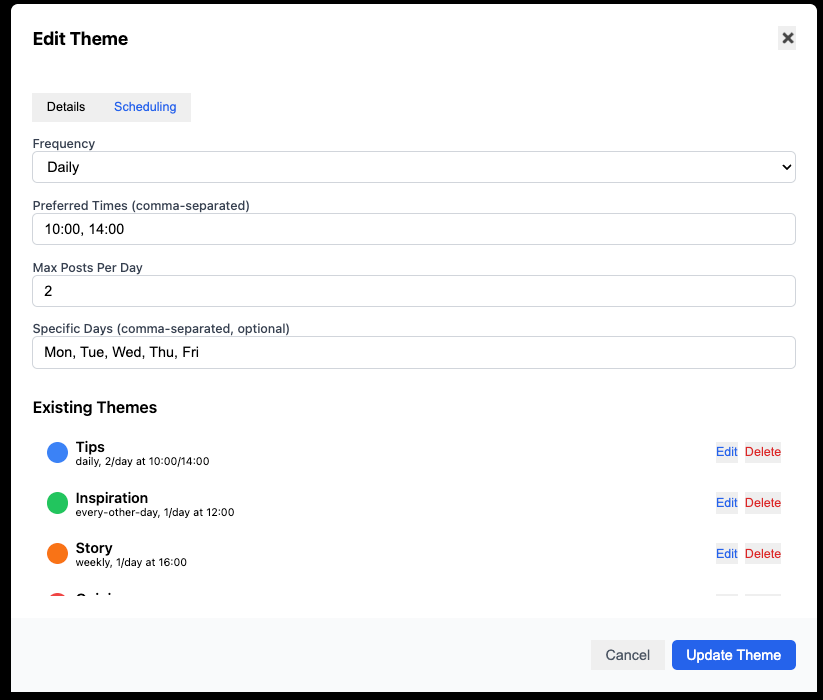
This is where you can edit the default schedule for the theme.
There is a configuration file called themes.yaml that is located in the src/templates folder of the Chrome extension.
I am showing you this file so that you can get a sense of what is possible using themes.
themes:
  - name: Tips
    color: 'bg-blue-100 text-blue-800'
    synonyms: ['EDUCATIONAL', 'GROWTH', 'TIP', 'TIPS']
    scheduling:
      frequency: 'daily'
      preferred_times: ['10:00', '14:00']
      max_per_day: 2
      days: ['Mon', 'Tue', 'Wed', 'Thu', 'Fri']

  - name: Inspiration
    color: 'bg-green-100 text-green-800'
    synonyms: ['INSPIRATIONAL']
    scheduling:
      frequency: 'every-other-day'
      preferred_times: ['12:00']
      max_per_day: 1
      days: null

  - name: Story
    color: 'bg-orange-100 text-orange-800'
    synonyms: ['ENTERTAINING', 'STORY']
    scheduling:
      frequency: 'weekly'
      preferred_times: ['16:00']
      max_per_day: 1
      days: ['Fri']

  - name: Opinion
    color: 'bg-red-100 text-red-800'
    synonyms: ['OPINION']
    scheduling:
      frequency: 'weekly'
      preferred_times: ['11:00']
      max_per_day: 1
      days: ['Tue']

  - name: News
    color: 'bg-yellow-100 text-yellow-800'
    synonyms: ['NEWS']
    scheduling:
      frequency: 'daily'
      preferred_times: ['08:00']
      max_per_day: 1
      days: null

  - name: Question
    color: 'bg-purple-100 text-purple-800'
    synonyms: ['QUESTION']
    scheduling:
      frequency: 'every-other-day'
      preferred_times: ['18:00']
      max_per_day: 1
      days: ['Mon', 'Wed', 'Fri']
The software is importing this file during initialization, and any edits are not saved to this file, but to the LocalStorage of your Chrome browser.
11. Drip Mode - Automated Scheduling
Drip scheduling, also known as drip content, is a method of releasing learning materials gradually over time, rather than providing all content upfront.
There are many benefits of planning your schedule ahead of time, such as
Reduce content overload - releasing content in manageable chunks helps avoid overwhelming readers
Increased engagement - by releasing content at regular intervals, drip scheduling can keep readers actively involved
Controlled release of materials - it allows creators to control the pace of learning and ensure students focus on the current week's content without being distracted by upcoming material
Launching new products - drip content can be used during beta launches of a course, allowing instructors to develop the curriculum while students are already participating
Substack Pro Studio offers two drip modes.
Classic sequential - automatically schedules all your drafts based on a preset time slot (default is 10:00 AM), finding empty slots in the future
Theme-aware scheduling - uses the unique scheduling rules (frequency, time, days) defined in the Theme Manager (see section 10).
Other key features include the following:
Theme-Based Rules - Per-theme frequency and timing preferences
Intelligent Scheduling - Automatic conflict avoidance
Configuration Options - Daily, every-other-day, weekly patterns
Preferred Times - Theme-specific optimal posting times
Day Restrictions - Allowed days per theme (e.g., Mon-Fri for Tips)
Max Per Day - Content distribution limits
If you use the Kanban board and drag-and-drop scheduling, it will use Theme-aware scheduling by default.
12. Historical Notes Sync
Substack Pro Studio provides a single-button sync to fetch the existing, posted Notes from Substack, enabling the following features:
Metrics Integration - Reactions, restacks, comments, clicks, free and paid subscribers
Performance Analytics - Engagement data visualization
Duplicate Prevention - Smart import management
Content Conversion - Substack format to scheduler format
Link Preservation - Original post references are clickable links
Sync Status - Progress tracking and error handling
13. Settings & Configuration
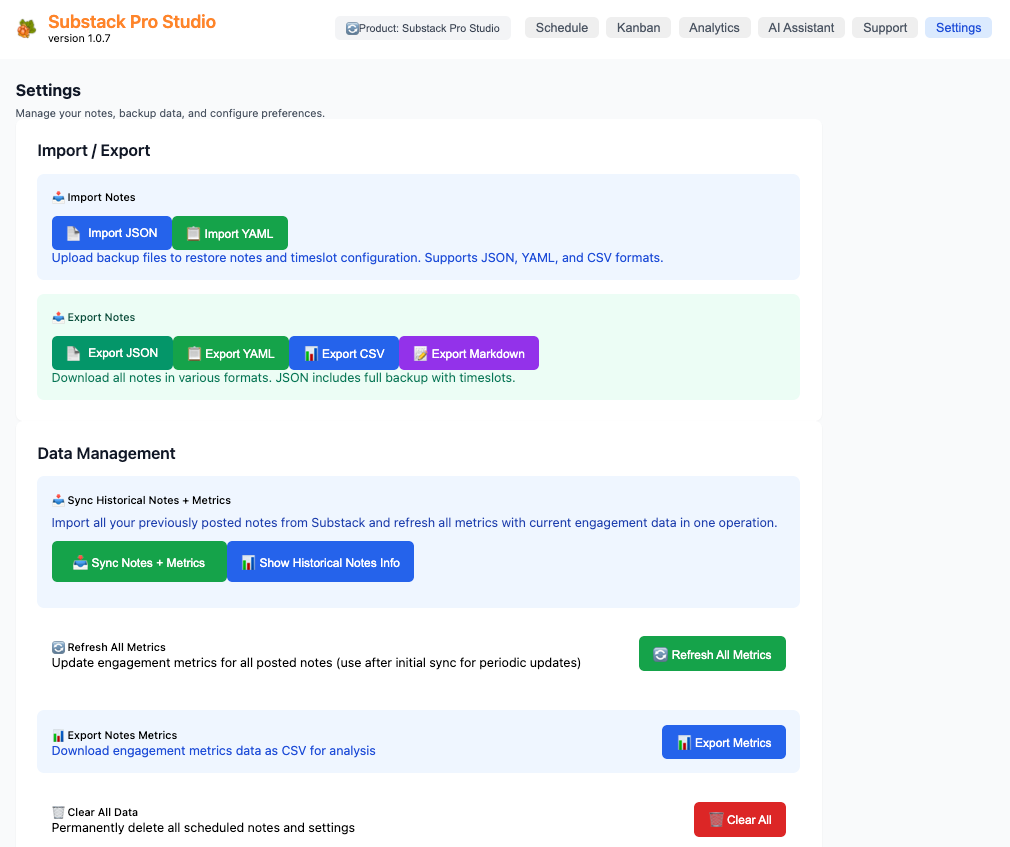
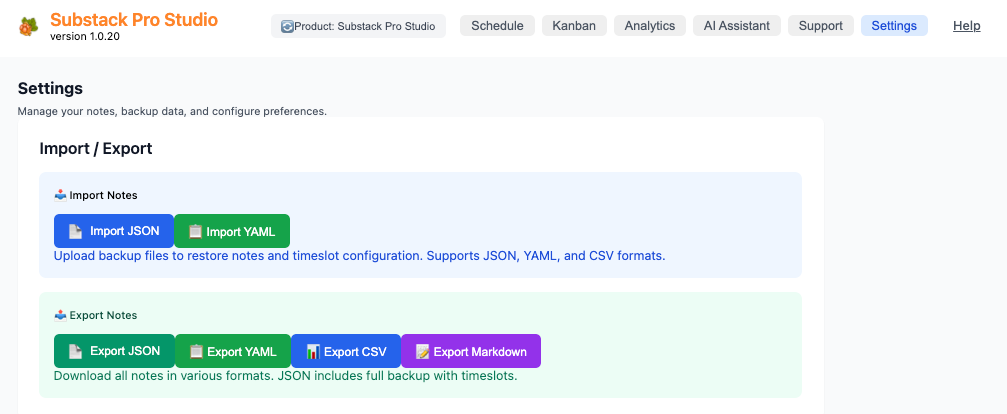
In the Settings view, you can find the Import/Export functions.
Import/Export
Export Options - JSON, YAML, CSV, and Markdown formats
Import Capabilities - Data restoration and validation
These functions are used to back up your notes. Take regular backups by exporting a JSON or YAML file to save your work.
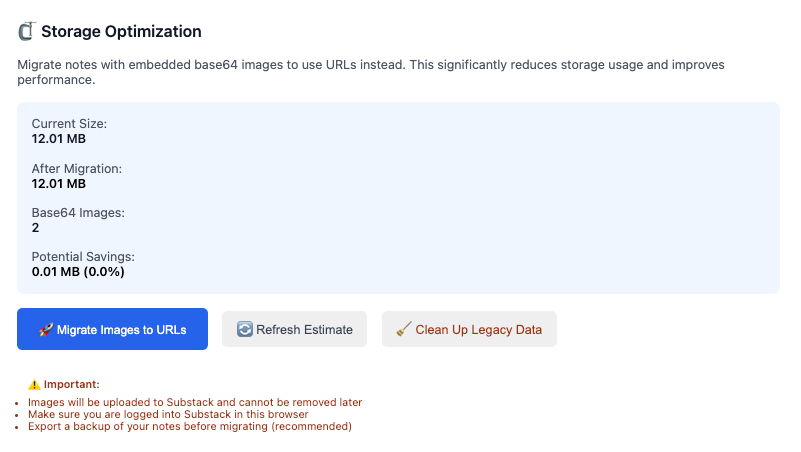
🗜️ Storage Optimization
Storage Optimization helps keep your extension fast by reducing the space your notes occupy. Adding pictures to notes can make your storage grow very large and slow down the app.
What’s the problem?
Pictures stored the old way (base64-encoded) can make notes hundreds of times larger than needed.
This slows down the extension and can cause errors when saving.
Your browser has a limit on how much storage extensions can use.
What does Storage Optimization do?
When you add a picture to a note, the extension now:
Uploads the picture to Substack right away
Saves a small link instead of the whole picture
Keeps your notes small and fast
Old notes with pictures, the old way, can be fixed with the migration tool.
The Three Buttons
🚀 Migrate Images to URLs
Finds all old notes with big picture files
Upload those pictures to Substack
Replaces the big files with small links
Shows you how much space you’ll save before starting
Takes 1-2 minutes for every 30-40 notes with pictures
🔄 Refresh Estimate
Check your notes again
Shows updated storage size and savings
Use this if you’ve added or edited notes since opening Settings
🧹 Clean Up Legacy Data
Removes leftover old picture data after migration
Only needed once after your first migration
Saves additional space from duplicate picture storage
How to use it
Open Settings from the main menu
Export your notes as a backup before migrating (recommended)
Scroll to the Storage Optimization section
Look at the estimate:
Current size: how much space your notes use now
After migration: how much space they’ll use after cleanup
Potential savings: how much space you’ll get back
Click 🚀 Migrate Images to URLs if you have pictures to migrate
After migration completes, click 🧹 Clean Up Legacy Data once
Tips
Your pictures are safe - they’re uploaded to Substack’s storage before any changes.
If a picture fails to upload, it stays in your note the old way
Migration can’t be undone, so export a backup first
After cleanup, your notes might show “0 MB” to save - that means you’re all set!
New pictures you add will automatically use the new, smaller method
Note: This is a one-time optimization. Once done, all your new notes will automatically use the efficient storage method.
Data management
Sync Historical Notes + Metrics -
Refresh All metrics -
Clear All Data - Complete reset functionality
Configuration
Restart Onboarding - Rerun the setup wizard to reconfigure the Substack connection. If you are managing multiple newsletters with different URLs, this might become handy.
Analytics Collection - Help improve the extension by sharing usage data. This includes feature usage, error reports, and performance metrics. No personal content is collected. You can Disable Analytics or Enable Analytics data collection with a click of a button.
Current Timeslots - shows the standard timeslots
Storage Debugging
Tools to diagnose and fix storage persistence issues.
Inspect Storage - shows how much storage is used, and what the local quota is
Reload from Storage - load Notes from local storage and show the total number
Clear Storage - this will delete all Notes, so be careful and take a backup before proceeding.
Backup Recommendations - Regular export best practices
14. Support & Diagnostics
Support view provides the following features:
Error Reporting - Rich text editor for problem description
Email Integration - Send error logs via email
Screenshot Support - Attach screenshots to support requests
15. Automated Posting System
Notes Scheduler is posting your scheduled notes automatically, in the background
NOTE: You MUST keep your browser open and prevent your computer from going to sleep.
Here are the main features:
Background Processing - Chrome alarms for scheduled posting
Status Lifecycle - Draft → Scheduled → Posting → Posted/Failed
Real-time Updates - Live status changes in UI
Chrome Notifications - Success and error alerts
Error Recovery - Failed post handling and retry options
Alarm Management - Automatic cleanup and cancellation
16. Troubleshooting & Support
Use the Support interface (section 14) when troubleshooting issues and requesting support.
Here are some topics where additional information will be provided:
Common Issues - Installation, connection, and scheduling problems
Error Messages - Understanding and resolving errors
Debug Tools - Technical troubleshooting resources
Support Contact - How to get help via email
Version Updates - Staying current with the latest features
17. Advanced Features & Tips
This section covers some advanced features and tips to get the most out of Substack Pro Studio
Keyboard Shortcuts - Navigation and editing efficiency
Window Management - Multi-tasking and workspace organization
Content Strategy - Using analytics for content planning
Workflow Optimization - Best practices for productivity
Integration Tips - Working with Substack and other tools
Bulk Operations - Managing multiple notes simultaneously
18. FAQ & Best Practices
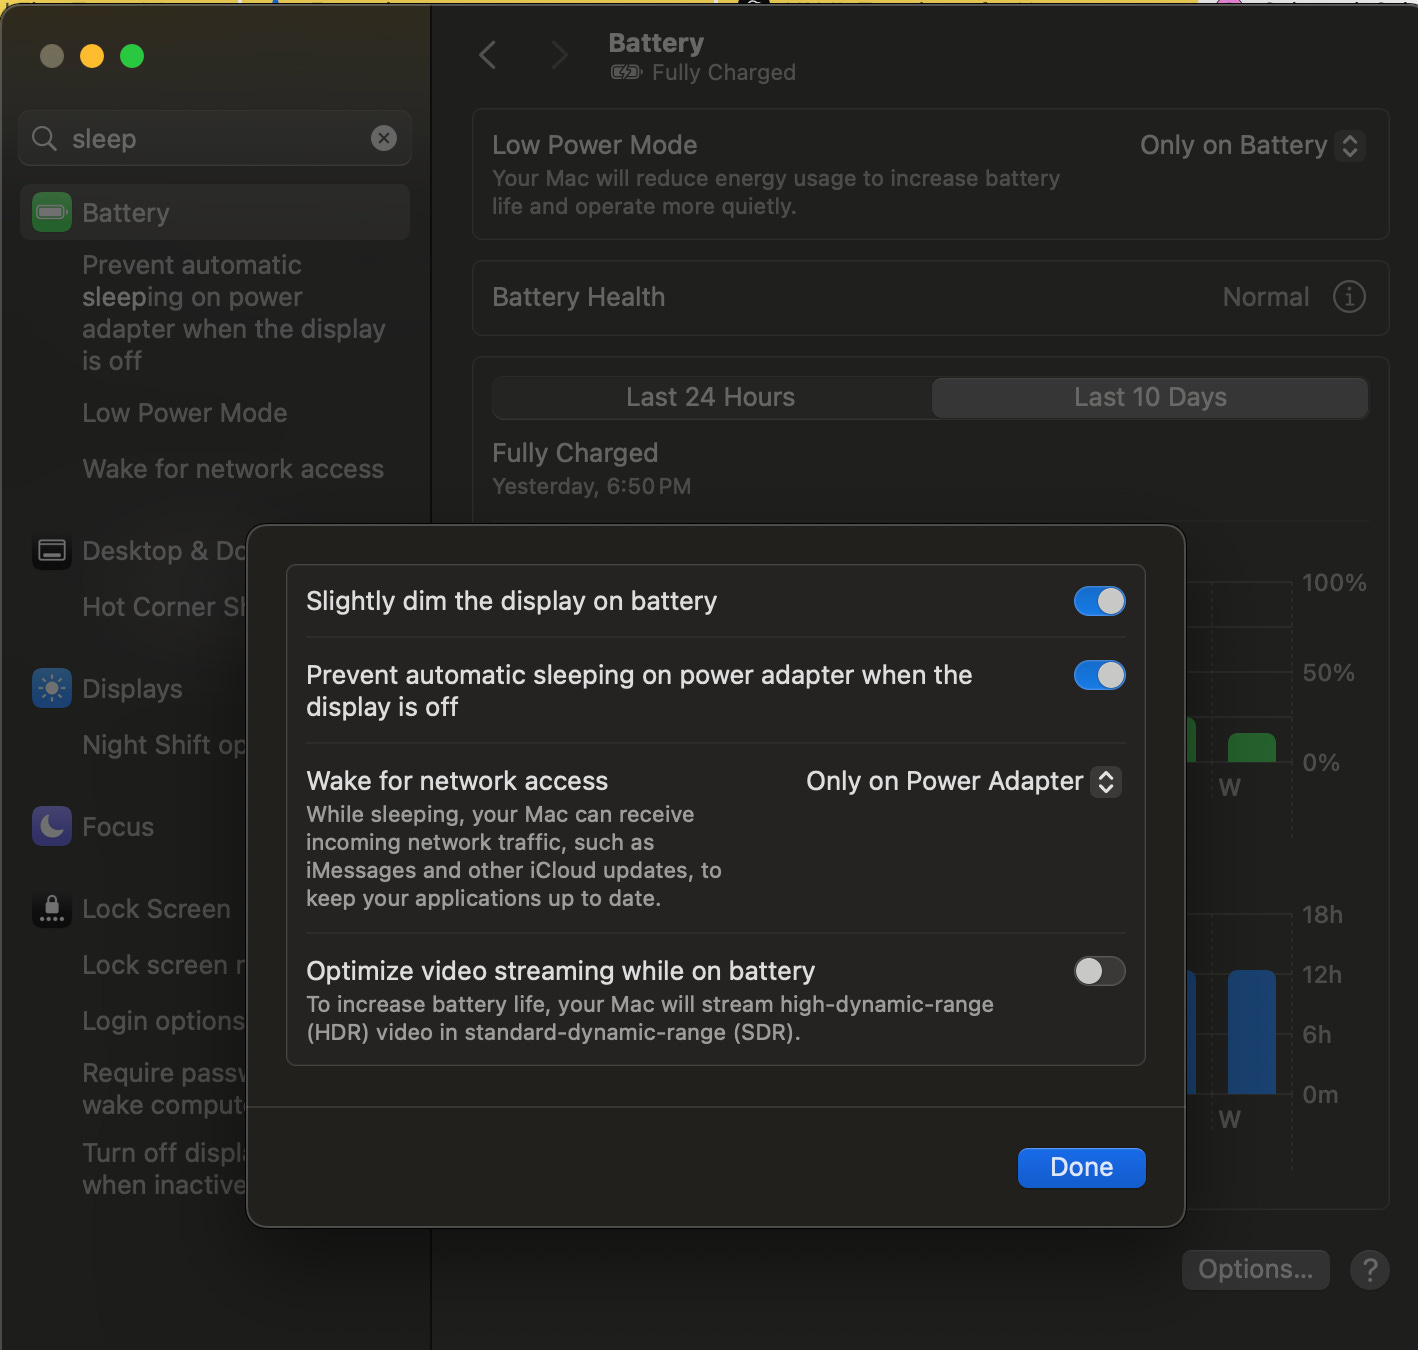
Q: How can I configure my Mac to keep the system running when I am not at my computer?
A: On macOS Sonoma 14.6.1 or later, you can search for "sleep" in your System Settings. There is an option to prevent the power adapter from automatically turning off when the display is off. See screenshot below.
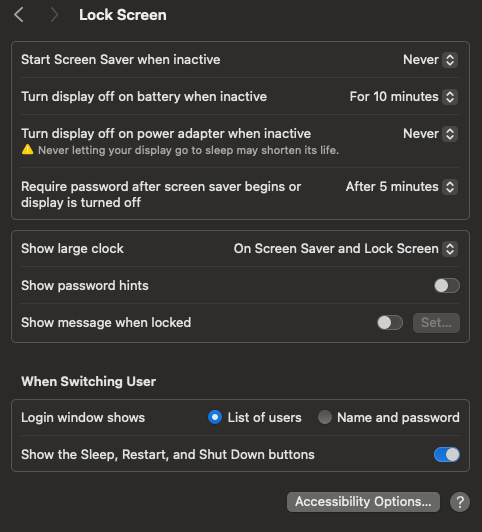
You may also want to set the Screen Saver when inactive to Never (when connected to power) - see below.
Q: I have a Chromebook laptop. How can I configure my settings?
A: This product has been tested with the Acer Chromebook Plus 514. Go to Settings > System preferences > Power, then search for "idle" - there you can toggle it as shown in the screenshot below.
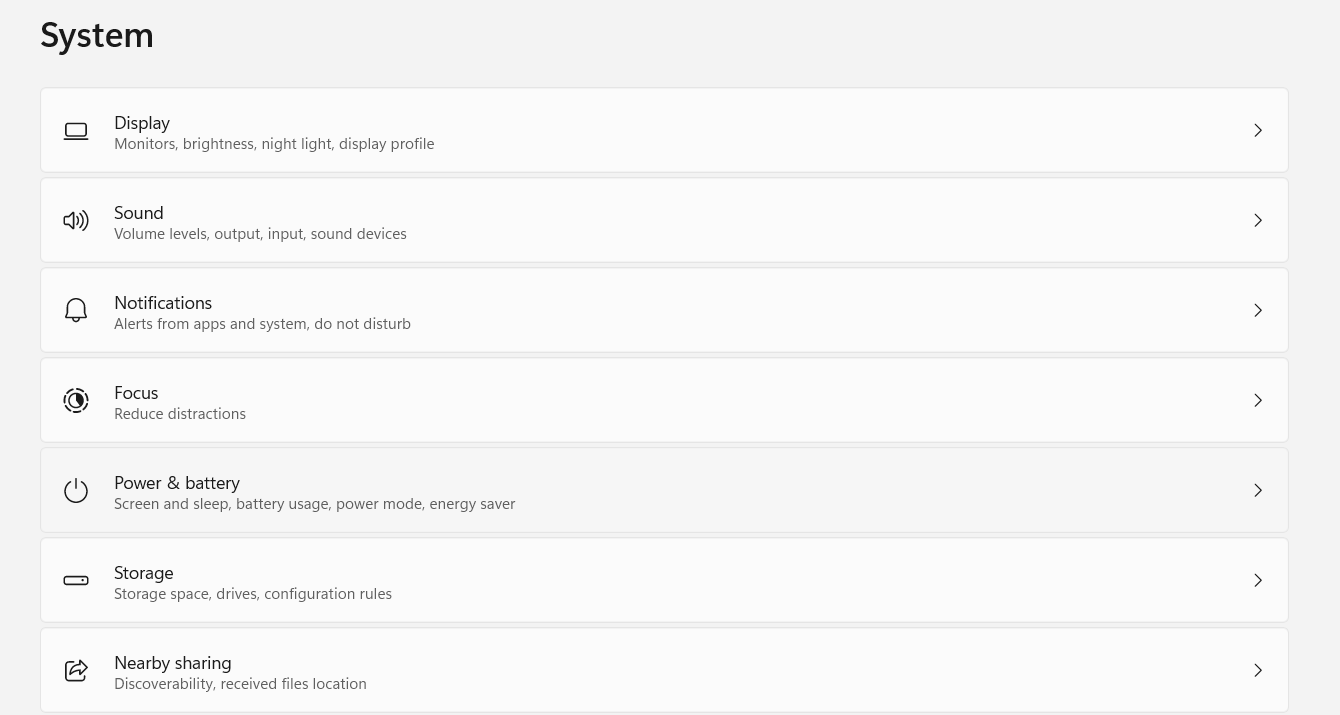
Q: How can I configure my Windows computer to keep running?
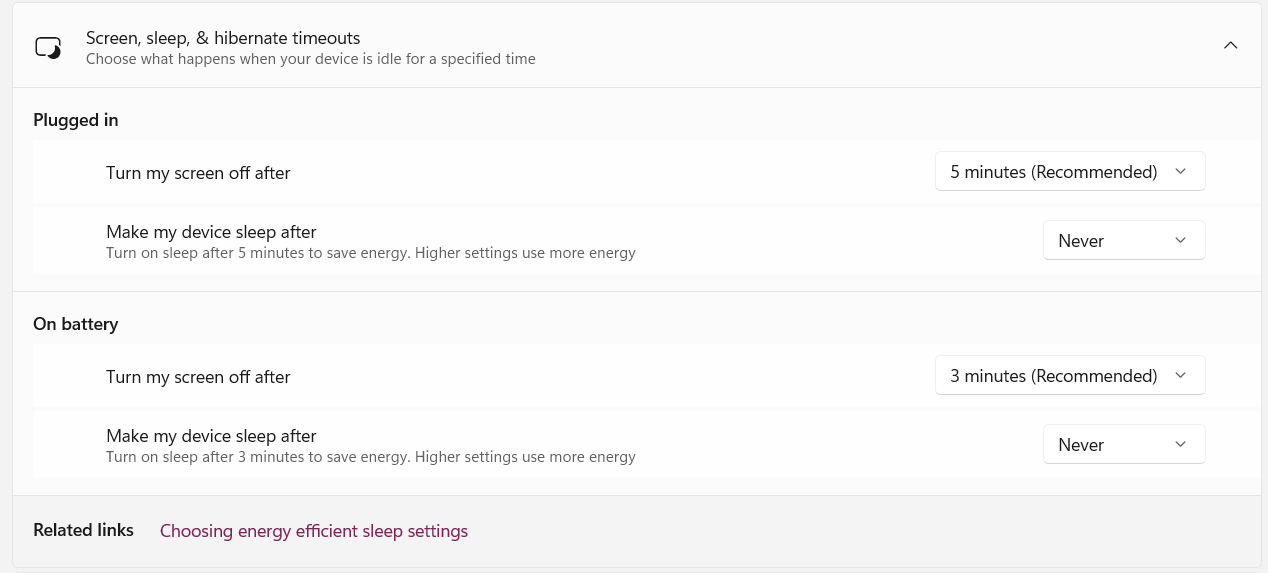
A: Go to Settings > settings > power & battery > screen, sleep, & hibernate timeouts
Frequently Asked Questions - Common user inquiries
Content Strategy Tips - Maximizing engagement and conversions
Scheduling Best Practices - Optimal timing and frequency
Theme Usage Guidelines - Effective content categorization
Performance Optimization - Getting the most from the tool
AI Assistant Workflow - Best practices for AI-generated content
19. Online Help
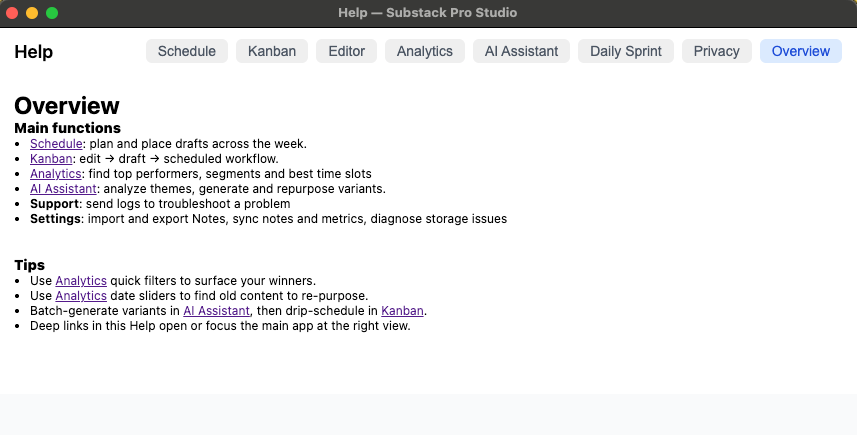
From version v1.0.15 onwards, the software includes online help, which opens a help window.
Online help contains details on each major functionality as well as the Privacy policy that explains how the Substack Pro Studio Chrome extension collects and uses analytics data to improve the user experience.
20. Upgrades to new versions
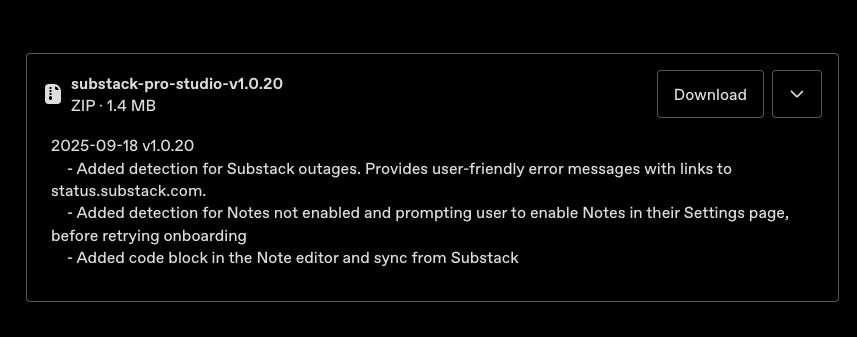
I post new versions frequently on Gumroad and send release notes to existing customers. You can access these new versions from the download link in your original purchase receipt email or by visiting the Gumroad Library page, which displays all products you have purchased, and then selecting Substack Pro Studio.
The software versions are listed in chronological order, with the latest version at the top (below the installation instructions).
Before installing a new version, take a backup of your Notes using Settings / Export JSON, which creates a backup of all your notes in a JSON file. After the upgrade, you can then use Import JSON to restore your notes.
Upgrade the software by downloading the latest version and following the steps explained in the “How to Install in Chrome Browser” section above.
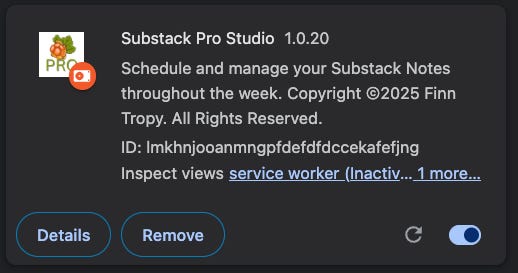
If you save the new version in the same directory where you unzipped the previous version, and use chrome://extensions/ by clicking the little circular refresh button on the bottom right to switch between versions. It should refresh the version number, and all your previous settings and notes stay intact.
However, if you use the Remove button, it will permanently delete everything, and you will have to start from scratch (or use the “Import JSON” feature from a Notes backup file).


