


I chatted with Ryan Hutchinson a few days ago about Substack Notes and how to automate the Note-posting process.
He shared a video clip from his private paid community demonstrating how he had built a system that automatically posted his social media content to multiple platforms, such as LinkedIn, X (former Twitter), YouTube, etc.
In the video, he showed how he would find the best high-performing content, copy it, and paste it into his Drafts sheet for editing and repurposing. Once the content was ready, he changed the status from “draft” to “ready” and set the schedule for the following week's posts. He used Airtable Sheets and Make to automate this whole process.
This automation offers many benefits for creators, solopreneurs, and bloggers.
Huge time savings: You can create a week’s worth of notes in one session and let the system post them according to a pre-set schedule.
Re-purpose the best-performing content: Accurate engagement metrics help you find content that resonates with your target audience.
Grow your newsletters faster: You can expand your newsletter visibility much quicker, using Notes discoverability to reach other creators and readers.
Substack’s problem is that it doesn’t offer similar APIs for scheduled posts to integrate with platforms like Make or Zapier, which are commonly used for this kind of automation.
How can Substack Scheduled Notes solve this problem?
One of the most significant pain points of Substack is the lack of scheduled Notes. While we are all waiting for the Substack team to address this issue, I created a solution you can use today.
I named it Substack Scheduled Notes Chrome Extension, and there has been overwhelming demand for this software. Although you must keep your Chrome browser running and prevent your computer from going to sleep mode, many Substackers have grabbed this product and reported success.
Inspired by Ryan Hutchinson’s example, I started developing automation to help a larger group of creators grow their newsletters faster.
I was using the following criteria when designing a solution:
Low cost: For business users, the monthly subscription fees are reasonable and can be expensed. However, for individual creators, solopreneurs, and bloggers, these monthly charges can accumulate quickly. I developed the solution using Google Sheets and App Script with reasonable consumer account quotas, so normal usage should remain free. You might want to consider a Google Workspace account if you are managing a business.
Ease of use: I wanted to make this simple for daily use, even if the configuration required a few steps. One button click will get you your Notes engagement metrics; another will schedule a week’s worth of Notes.
Flexibility: I have customers worldwide, including those from the U.S., Canada, the United Kingdom, Germany, Sweden, Brazil, Singapore, and Australia. These Substackers want to schedule Notes in different time zones using various computers, from MacBooks and Windows PCs to Chromebooks.
With this in mind, I built a solution that allows you to connect the Substack Scheduled Notes Chrome Extension to a Google Sheet using Apps Script as a web interface to read and write data.
With a button click, you can fetch all your existing Notes from Substack into a Google Sheet like the one below. It provides the text content, creation date, engagement metrics, and a direct link to the Note in Substack.

The spreadsheet contains more columns; I have just marked them as hidden. You can select the whole sheet and sort it by different columns, such as “metrics.reaction_count” or “metrics.restacks.”
When you want to schedule some Notes, you only have to add rows. Each row has “content.text”, “date,” “timezone,” “scheduledAt,” and “status” columns.
You set the date and time you want to post and the time zone (EST is -5 hours from UTC). The column “scheduledAt” converts the time to UTC by subtracting the time zone column. I am using the following formula for column D:
=TEXT((B2-C2), "YYYY-MM-DDTHH:MM:SS.sssZ")The “status” column indicates whether this row is a draft or ready for posting.
Once again, the Substack Scheduled Notes Chrome Extension reads the Notes sheet with a single click on the “Google Sheet” button, filters the “ready” notes with a future date, and schedules them for posting.

The attached video clip shows how simple and fast this Substack Scheduled Notes automation can make your life as a creator.
How can you configure your own Google Sheets and Apps Script project?
You must configure some details for this connection to Google Sheets. To access the configuration page, click the “gear” icon in the top right corner of the Chrome extension.

STEP 0: Below is the Options & Settings window with configured Deployment ID and Sheet Name fields. The Deployment ID is the key that unlocks access to your Google Sheet, but you must first grant permission to access your account. The details on how to create this Deployment ID are below.

STEP 1: Select Apps Script from the Extensions menu of your Google Sheet to create the Deployment ID, as shown below.

STEP 2: Add the following code to the Code.gs window. This code allows your Chrome Extension to read data (doGet) and write sheets data (doPost) to the Sheet Name from STEP 0 above on your Google Sheet. In my case, I used “Substack Notes” as the sheet name.
Please verify the code below to ensure it is secure before granting permission to your Google account.
function doGet() {
    var sheet = SpreadsheetApp.getActiveSheet();
    var data = sheet.getDataRange().getValues();
    var JSONString = JSON.stringify(data);
    var JSONOutput = ContentService.createTextOutput(JSONString);
    JSONOutput.setMimeType(ContentService.MimeType.JSON);
    return JSONOutput
  }


  function doPost(e) {
      const params = JSON.parse(e.postData.contents);
      const action = params.action;
      const sheetName = params.sheetName; // Sheet name provided in the request

      if (action === "postSheet") {
          return postSheetData(params.data, sheetName);
      }

      return ContentService.createTextOutput(JSON.stringify({ error: "Invalid action" })).setMimeType(ContentService.MimeType.JSON);
  }

  /**
   * Posts data to a specific Google Sheet by name.
   * @param {Array<Array<any>>} table - The data to post to the sheet.
   * @param {string} sheetName - The name of the sheet to update.
   * @returns {ContentService.Output} - JSON response indicating success or failure.
   */
  function postSheetData(table, sheetName) {
      try {
          const ss = SpreadsheetApp.getActive();
          let sheet = ss.getSheetByName(sheetName);

          if (!sheet) {
              // Create the sheet if it doesn't exist
              sheet = ss.insertSheet(sheetName);
          } else {
              // Clear the sheet if it exists
              sheet.clear();
          }

          // Write the data to the sheet
          sheet.getRange(1, 1, table.length, table[0].length).setValues(table);

          return ContentService.createTextOutput(JSON.stringify({ success: true })).setMimeType(ContentService.MimeType.JSON);
      } catch (error) {
          return ContentService.createTextOutput(JSON.stringify({ success: false, error: error.message })).setMimeType(ContentService.MimeType.JSON);
      }
  }
STEP 3: Create a new Deployment from the Deploy button:

STEP 4: Provide a Description for the new deployment:

STEP 5: Copy and paste the Deployment ID into the Options & Settings window above in STEP 0.

STEP 6: Next, you'll need to allow your Google account to use Apps Script.
When you click the Run button (beside Debug), the following “Authorization required” popup window appears.

STEP 7: Click Review permissions, and the Sign in with Google with your own Google email address appears.
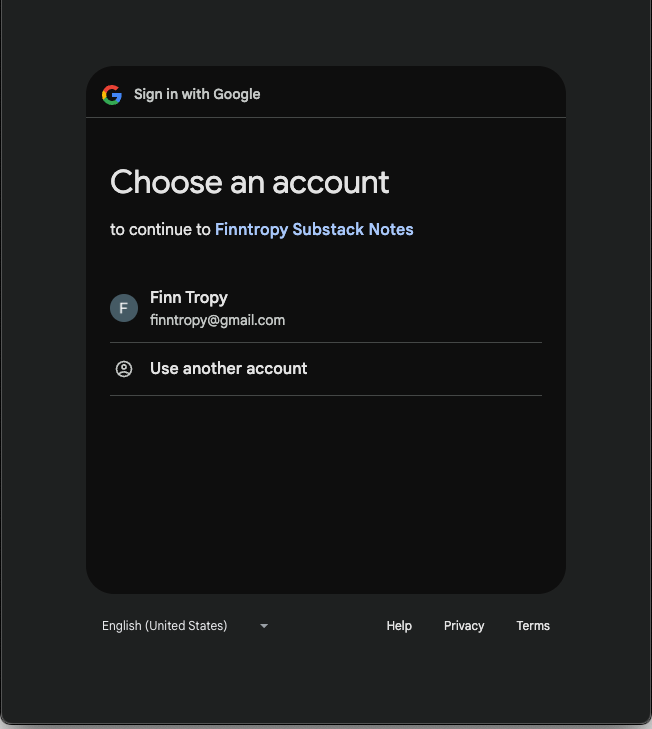
Step 8: Select your own email address above and click Advanced in the next window. You will receive the following security warning that Google has not verified this Apps Script from STEP 2.

STEP 9: Click Go To Finntropy Substack Notes (or whatever you named the deployment project in STEP 4).

STEP 10: Next, you must grant the Apps Script project to see, edit, create, and delete all your Google Sheets spreadsheets.
Click Allow, and your Apps Script project has been authorized to access your Google Sheets. Since this is your own Apps Script project, nobody other than the account you authorized will have access to your sheets.

STEP 11: Open the Chrome Extension and click the “Fetch” button. After correctly following the above instructions, you should see the Status line change. Once all the Notes have been fetched from your Substack, the Chrome extension will use the configured Deployment ID and Substack Name from STEP 0, and you should see a new Sheet with the name you gave containing your Notes and respective metrics.
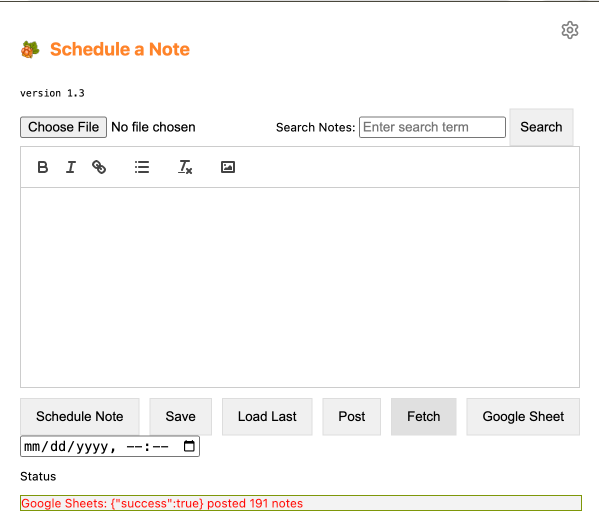
Congratulations! You now have a working automation system in place.
Just so you know, if you need to remove access, you can go to https://myaccount.google.com/connections and select the Apps Script to do so.
Where can I get the Substack Scheduled Notes Chrome Extension?
This tool is available from Gumroad for a nominal price. See Substack Scheduled Notes - Chrome Extension.
I have multiple versions available. Please download version 1.3.1 or later and follow the installation instructions.
Remember to keep your Chrome browser running on your Notes page and prevent your computer from going to sleep mode.
Do you have any questions or comments?
Join the chat below

